
Page 786 - EMUGE
P. 786
Spannzangen · Collets
Product
Finder ER-GB Mit Vierkantmitnahme
Soft- With square drive
synchro
Speed- DIN ISO 15488
synchro
(DIN 6499)
KSN
MQL
MMS IKZ MMS
MQL
SFM
pmax pmax
SWITCH- 50bar 100bar L
MASTER (700psi) (1400psi)
GR, GR-S
HF
ø D ø D 2
EM
Zubehör K 2
Accessories L 3
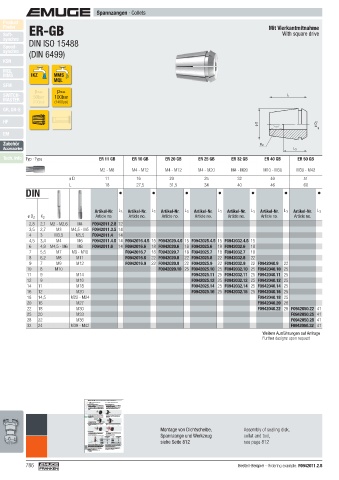
Tech. Info Typ · Type ER 11 GB ER 16 GB ER 20 GB ER 25 GB ER 32 GB ER 40 GB ER 50 GB
M2 - M8 M4 - M12 M4 - M12 M4 - M20 M4 - M20 M10 - M30 M30 - M42
ø D 11 16 20 25 32 40 51
L 18 27,5 31,5 34 40 46 60
DIN
Artikel-Nr. L 3 Artikel-Nr. L 3 Artikel-Nr. L 3 Artikel-Nr. L 3 Artikel-Nr. L 3 Artikel-Nr. L 3 Artikel-Nr. L 3
ø D 2 K 2 Article no. Article no. Article no. Article no. Article no. Article no. Article no.
2,8 2,1 M2 - M2,6 M4 F0942011.2.8 12
3,5 2,7 M3 M4,5 - M5 F0942011.3.5 14
4 3 M3,5 M5,5 F0942011.4 14
4,5 3,4 M4 M6 F0942011.4.5 14 F0942016.4.5 15 F0942020.4.5 15 F0942025.4.5 15 F0942032.4.5 15
6 4,9 M4,5 - M6 M8 F0942011.6 14 F0942016.6 18 F0942020.6 18 F0942025.6 18 F0942032.6 18
7 5,5 M7 M9 - M10 F0942016.7 18 F0942020.7 18 F0942025.7 18 F0942032.7 18
8 6,2 M8 M11 F0942016.8 22 F0942020.8 22 F0942025.8 22 F0942032.8 22
9 7 M9 M12 F0942016.9 22 F0942020.9 22 F0942025.9 22 F0942032.9 22 F0942040.9 22
10 8 M10 F0942020.10 25 F0942025.10 25 F0942032.10 25 F0942040.10 25
11 9 M14 F0942025.11 25 F0942032.11 25 F0942040.11 25
12 9 M16 F0942025.12 25 F0942032.12 25 F0942040.12 25
14 11 M18 F0942025.14 25 F0942032.14 25 F0942040.14 25
16 12 M20 F0942025.16 25 F0942032.16 25 F0942040.16 25
18 14,5 M22 - M24 F0942040.18 25
20 16 M27 F0942040.20 28
22 18 M30 F0942040.22 28 F0942050.22 41
25 20 M33 F0942050.25 41
28 22 M36 F0942050.28 41
32 24 M39 - M42 F0942050.32 41
Weitere Ausführungen auf Anfrage
Further designs upon request
Aufnahmen und Gewindeschneidapparate · Tap Holders and Tapping Attachments
Product
Finder 7.2 Montage von Dichtscheibe, Spannzange 7.2 Assembly of sealing disk, collet and tool
Soft- und Werkzeug
synchro
synchro Speed- Montage der Dichtscheibe bei den Größen 1-5 Assembly of sealing disk in the sizes 1-5
1. Insert the sealing disk into the clamping nut as shown in the illustration,
1. Dichtscheibe wie abgebildet in die Spannmutter einsetzen, nach vorne
KSN schieben, bis ein deutliches Einrasten zu hören ist. Die Dichtscheibe ist and push it forward until you can clearly hear it engaging. After that, the
MQL dann bündig mit der Spannmutter. sealing disk is fl ush with the clamping nut.
MMS Bei der Größe 0 können Spannmuttern mit integriertem Dichtsystem In size 0, you can use clamping nuts with integrated sealing system – a
verwendet werden – es wird keine separate Dichtscheibe benötigt. Die
separate sealing disk is not needed then. The clamping nut must be
SFM Spannmutter wird entsprechend dem eingesetzten Spanndurchmesser selected in accordance with the clamping diameter used.
gewählt.
SWITCH-
MASTER
GR, GR-S Klick!
HF Click!
EM
2. Spannzange in die Spannmutter einschieben, anschließend kippen. 2. Insert the collet into the clamping nut, then tilt it. The groove of the collet
Zubehör Nut der Spannzange an der markierten Stelle in den Exzenterring der must engage in the eccentric ring of the clamping nut at the marked
Accessories Spannmutter einrasten. position. Now, tilt the collet in the opposite direction until you clearly
Tech. Info
Spannzange in entgegengesetzte Richtung kippen, bis diese deutlich hear it engaging.
hörbar einrastet.
Nut der Spannzange
Groove of collet
Klick!
Click!
Markierung (Lage von Muttertyp abhängig) Excenterring
Marking (position depends on type of nut) Eccentric ring
3. Spannmutter mit der eingerasteten Spannzange auf das Gewinde der 3. Screw the clamping nut with the engaged collet onto the thread of the
Spannzangen-Aufnahme schrauben. holder.
Wichtig: Nur Spannmuttern mit richtig eingerasteter Spannzange Important: Only screw on clamping nuts with correctly engaged collet!
montieren!
Montage von Dichtscheibe, Assembly of sealing disk,
4. Werkzeug einschieben. 4. Insert tool.
Wichtig: Wird eine Spannzange mit integriertem Vierkant verwendet, Important: If you use a collet with integrated square, make sure to turn
muss das Werkzeug durch drehen in die Position gebracht werden, the tool around until it is in a position that allows it to be pushed into the
dass es in das Vierkant der Spannzange geschoben werden kann. square seat of the collet.
5. Spannmutter mit Schlüssel festziehen. 5. Tighten the clamping nut with the wrench.
Hierbei sind die empf. Anzugsdrehmomente aus der Tabelle zu beachten. Observe the rec. torque values in the table. Spannzange und Werkzeug collet and tool,
Typ Empf. Anzugsdrehmoment Typ Empf. Anzugsdrehmoment
Type Rec. tightening torque Type Rec. tightening torque
(Nm) (Nm)
Hi-Q/ERM 8 6 Hi-Q/ERC 11 14
2 2 Hi-Q/ERM 11 12 Hi-Q/ERC 16 40
1 1 Hi-Q/ER 11 14 Hi-Q/ERC 20 32
Hi-Q/ER 50 300 Hi-Q/ERC 25 80 siehe Seite 812
Hi-Q/ERMC 11 12 Hi-Q/ERC 32 90 see page 812
Hi-Q/ERMC 16 24 Hi-Q/ERC 40 180
Hi-Q/ERMC 20 28 Hi-Q/ERBC 50 AF 300
Hi-Q/ERMC 25 32
Angaben gelten bei Verwendung von Spannzangen Typ ER-GB. Das maximale The indicated values apply to collets type ER-GB. The maximum tightening torque must
Anzugsdrehmoment darf nicht mehr als 25% über den empfohlenen Werten liegen. not be more than 25% above the recommended tightening torque. Higher tightening
Bei höheren Anzugsdrehmomenten können an der Spannzangenaufnahme bleibende torque may result in the damage of the collet. For the setting of the correct torque,
Deformationen auftreten. Um das korrekte Drehmoment einstellen zu können, we recommend using a torque wrench, see page 795.
empfehlen wir die Verwendung eines Drehmomentschlüssels, siehe Seite 795.
Wichtig: Um die Spannzangenaufnahme nicht zu beschädigen, Important: In order to avoid damage to the holder, please counter with
muss beim Anziehen der Spannmutter mittels Schlüssel 1 mit dem open-ended spanner 2 while tightening the clamping nut with wrench 1.
Gabelschlüssel 2 gegengehalten werden. For suitable tool sets, see pages 793 - 794.
Passende Werkzeugsets fi nden Sie auf Seite 793 - 794.
812
786 Bestell-Beispiel · Ordering example: F0942011.2.8