
Page 1103 - Rollingbearings
P. 1103
Installation and removal
Lock nuts with Locking bearings on a cylindrical
seat
integral locking
1 With the bearing in position, screw the
Lock nuts with integral locking are easy to lock nut into place
install Each nut is provided with four equally 2 Tighten the nut against the bearing with a
spaced slots around its circumference to hook spanner, making sure to not over
accommodate a hook spanner The designa- tighten it
tions of the associated spanners are listed in 3 Tighten the grub (set) screw to the torque
the product table, page 1112 value listed in the product table
Lock nuts with integral locking can be
reused, provided they are not damaged
Dismounting
Mounting 1 To remove the lock nut, loosen the grub
screw Even when the grub screw is
Mounting bearings on a tapered removed, the lock nut will generate a lim-
seat or special adapter sleeve ited locking torque
2 In order to completely release the locking
1 Slide the bearing onto its tapered seat system and facilitate the reuse of the lock
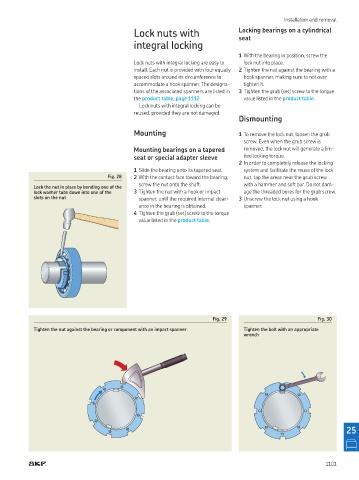
Fig. 28 2 With the contact face toward the bearing, nut, tap the areas near the grub screw
screw the nut onto the shaft with a hammer and soft bar Do not dam-
Lock the nut in place by bending one of the
lock washer tabs down into one of the 3 Tighten the nut with a hook or impact age the threaded bores for the grub screw
slots on the nut spanner, until the required internal clear- 3 Unscrew the lock nut using a hook
ance in the bearing is obtained spanner
4 Tighten the grub (set) screw to the torque
value listed in the product table
Fig. 29 Fig. 30
Tighten the nut against the bearing or component with an impact spanner Tighten the bolt with an appropriate
wrench
25
1101